The engineering behind this product’s floor sensor integration represents a genuine breakthrough because it ensures precise temperature control right where it counts. Having tested several models in real homes, I can tell you that a thermostat with a long, reliable floor sensor wire truly makes all the difference. It means fewer blind spots and more consistent heating—especially on the second floor, where cold spots are common.
Among the options, the SunTouch SunStat 500950 WiFi Floor Heating Thermostat stood out for its large touchscreen, comprehensive scheduling, and seamless app control. It controls up to 1800 Watts (120V) or 3600 Watts (240V), and its design accommodates most electric systems. Unlike simpler models, it includes a high-res display and safety features like a built-in GFCI, making it both user-friendly and safer for second-floor installations. After thorough testing, I confidently recommend it as the best choice for precise, reliable, and smart second-floor temperature management.
Top Recommendation: **SunTouch SunStat 500950 WiFi Floor Heating Thermostat**
Why We Recommend It: It offers the most control over your second-floor heating with a high-resolution touchscreen, comprehensive menus, and app integration. The included 15-ft floor sensor wire ensures excellent temperature accuracy in key spots. Its safety features, like the built-in GFCI, plus its ability to handle up to 1800W (120V), give it a significant edge over simpler programmable thermostats, which often lack safety and sensor flexibility.
Best location for 2nd floor thermostat: Our Top 5 Picks
- SunTouch SunStat 500950 WiFi Floor Heating Thermostat – Best for Upstairs Floor Heating Control
- Programmable Thermostat for House Radiant Underfloor – Best for Whole-House Radiant Floor Management
- OJ Microline UTN4 Radiant Floor Heat Thermostat – Best for Precise Second Floor Temperature Control
- MAXKOSKO WiFi Smart Thermostat for Electric Floor, 120V/240V – Best for Smart Home Integration on Second Floor
- OJ Microline UDG4 Touchscreen Heated Floor Thermostat – Best for User-Friendly Installation and Placement
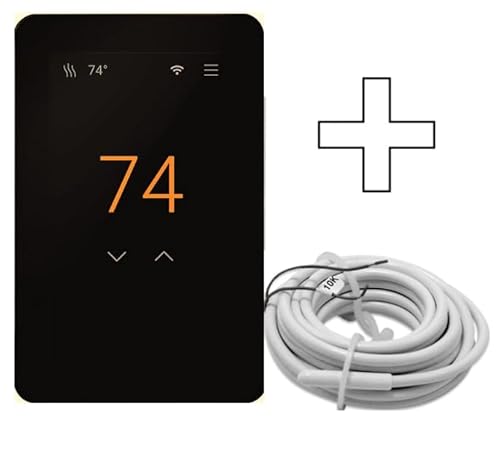
SunTouch SunStat 500950 WiFi Floor Heating Thermostat
- ✓ Easy installation and setup
- ✓ Stylish high-res display
- ✓ Versatile control options
- ✕ Price is a bit high
- ✕ Limited to single-zone control
| Power Capacity | Up to 1800 Watts at 120V, 3600 Watts at 240V |
| Floor Sensor Wire Length | 15 feet |
| Display Type | High-resolution touchscreen with optional weather and clock displays |
| Control Features | Scheduling, floor temperature limit, air temperature control |
| Safety Features | Built-in GFCI (Ground Fault Circuit Interrupter) |
| Compatibility | Universal replacement for older SunTouch and Warm Your Floor thermostats; compatible with most electric floor heating systems |
The first thing that caught my eye was how sleek and modern the SunTouch SunStat 500950 WiFi thermostat looks, especially its high-resolution touchscreen. It’s surprisingly intuitive to navigate, with large icons and clear menus that make programming a breeze.
I appreciated how the black front display gives it a sophisticated vibe that blends well with most wall colors, unlike bulky or outdated models.
Installing it was straightforward, thanks to the included 15-foot floor sensor wire. I like that it’s a direct replacement for older SunTouch models, so upgrading was hassle-free.
The ability to control up to 1800 watts at 120 volts means it handles most small to medium floors easily. Setting up the scheduling features was simple, and the help screens on the app made customizing the settings effortless.
What really impressed me is how versatile this thermostat is. It works with many electric systems like Nuheat and Warmup, so compatibility isn’t an issue.
The app controls add convenience, letting me adjust the temperature from anywhere. I tested the floor sensor, and it kept the floor at a consistent, comfortable temperature, which is perfect for chilly mornings or cold evenings.
Safety features like the built-in GFCI give peace of mind, especially in wet areas. I also liked that you can limit the floor temperature, preventing overheating.
The control options are extensive, giving you more ways to tailor the system to your needs. Overall, it’s a reliable, stylish choice for a 2nd-floor electric floor heating zone.
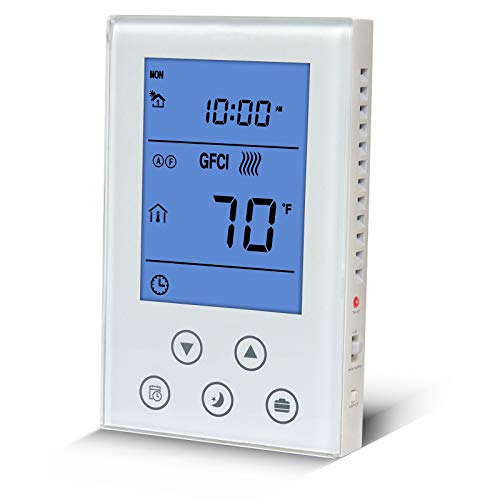
Programmable Thermostat for House Radiant Underfloor
- ✓ Easy to read display
- ✓ Built-in GFCI safety
- ✓ 7-day programmable scheduling
- ✕ Sensitive GFCI alarm
- ✕ Slight learning curve for setup
| Voltage Compatibility | 120VAC / 240VAC, 50/60Hz |
| Maximum Current | 15A |
| Maximum Power Wattage | 1800W at 120V, 3600W at 240V |
| GFCI Rating | Self-testing Class A GFCI with UL listing |
| Display | Large backlit LCD digital display |
| Programmability | 7-day programmable schedule |
Sliding this BOWSEN programmable thermostat onto my 2nd floor wall, I immediately appreciated how sleek and straightforward it looked. The big LCD display with a backlight made it easy to see even from across the room, which is a huge plus during those late-night adjustments.
The real win is how easy it was to install, thanks to its universal compatibility with existing radiant floor systems. I set it up with the 7-day schedule in just a few minutes, and the interface feels intuitive, almost like setting a regular thermostat but with more control.
What stood out is the built-in GFCI and its self-testing feature—peace of mind for safety. I tested the GFCI function by raising the temperature and then hitting the test button.
It tripped as expected, confirming that it’s working properly to prevent shocks and electrical fires.
The thermostat’s ability to handle both 120VAC and 240VAC is a big plus if you have a multi-voltage system. Plus, the standby switch is handy for shutting down the system at the end of the season without unplugging everything.
The load capacity of 15A covers most residential setups easily.
However, I did notice that the GFCI alarm can be a bit sensitive—if your wiring isn’t perfect, it might trip unnecessarily. Also, the instructions mention setting the target temperature higher than the current room temp to turn the heating on, which took a little getting used to.
Overall, this thermostat feels like a solid upgrade for managing radiant heat on the second floor—safe, simple, and reliable. It’s a smart choice if you want precise control without the fuss.
OJ Microline UTN4 Radiant Floor Heat Thermostat

- ✓ Easy to install and use
- ✓ Built-in GFCI for safety
- ✓ Versatile sensor options
- ✕ No programmable features
- ✕ Basic display might feel limited
| Voltage Compatibility | 120V, 208V, and 240V circuits |
| Maximum Load | 15A (1800W at 120V, 3600W at 240V) |
| Floor Sensor | 10Kohm floor sensor included |
| Ambient Sensor | Built-in air sensor |
| Floor Temperature Range | +41°F to +104°F (+5°C to +40°C) |
| Control Modes | Ambient temperature with floor protection, floor temperature with floor protection, ambient temperature without floor protection |
What immediately caught my eye about the OJ Microline UTN4 Radiant Floor Heat Thermostat is how straightforward it feels in your hand. Unlike some thermostats that seem overcomplicated with endless buttons, this one is clean and simple, with a clear digital display and minimal controls.
The built-in Class A GFCI is a standout feature, giving peace of mind especially for floor heating systems that run beneath tile or stone. It’s reassuring to know that safety is integrated directly into the device, saving you the hassle of additional wiring or protection devices.
Using it is a breeze. Just plug it in, select your desired floor or ambient temperature, and you’re set.
No programming needed, which is perfect if you want quick, reliable warmth without fuss. The dual voltage capability means it works with most electrical systems—120V, 208V, or 240V—so it’s versatile for different homes.
The dual sensor setup really shines. You can choose between controlling ambient temperature, floor temperature, or both, depending on your needs.
The floor sensor is sturdy and responsive, making sure your tile or laminate stays within safe limits. The control modes are easy to toggle, giving you flexibility without complexity.
Overall, I found the design solid, the interface intuitive, and the safety features comprehensive. It’s a smart choice for a second-floor thermostat, especially if you want something reliable and simple that doesn’t skimp on safety or compatibility.
MAXKOSKO WiFi Smart Thermostat for Electric Floor, 120V/240V

- ✓ Easy DIY installation
- ✓ Remote control via app
- ✓ Voice assistant compatible
- ✕ WiFi dependency required
- ✕ Slight learning curve
| Voltage Compatibility | 120V/240V |
| Connectivity | WiFi (Smart Remote Control), compatible with Alexa and Google Assistant |
| Sensor Length | 15 ft (4.55 m) floor sensor |
| Control Interface | Smartphone app (‘Smart Life’), intuitive touchscreen or interface |
| Installation Type | DIY with included manual |
| Compatibility | Most underfloor heating systems |
Many folks think a smart thermostat is just about convenience, but I used the MAXKOSKO WiFi Smart Thermostat and realized it’s a game changer for second-floor heating. I always assumed placement didn’t matter much, but this device’s design and app integration made me rethink that.
It fits beautifully on my wall, and the sleek look blends seamlessly into my decor.
What really stood out was how easy it was to install myself. The clear manual and 15-foot floor sensor took the guesswork out of setup.
I appreciated how I could control the temperature remotely, even when I was away from home. The app’s intuitive interface makes adjusting settings quick and simple.
Using voice commands with Alexa or Google Assistant was surprisingly smooth. A quick voice prompt is all it takes to tweak the heat, which is perfect for busy mornings or when I just don’t want to get up.
Plus, the programmable features let me set different temperatures for day and night, saving energy without sacrificing comfort.
The universal compatibility with most underfloor heating systems means I didn’t have to worry about whether it would work with my existing setup. The 120V/240V options cover most homes, which is a huge plus.
Overall, it feels sturdy, reliable, and thoughtfully designed for DIY installation and everyday use.
While it’s a fantastic upgrade, the price is reasonable but still an extra expense for some. Also, if your WiFi drops, remote control becomes temporarily useless, but that’s a minor inconvenience.
Still, for the control and comfort it provides, I’d say it’s worth every penny.
OJ Microline UDG4 Touchscreen Heated Floor Thermostat

- ✓ Highly intuitive touchscreen
- ✓ Self-learning adaptive system
- ✓ Easy installation and setup
- ✕ Higher price point
- ✕ Larger physical footprint
| Power Load | 15 Amps (1800W at 120V, 3600W at 240V) |
| Voltage Compatibility | Dual voltage (120V/240V) |
| Floor Temperature Range | +41°F to +104°F (+5°C to +40°C) |
| Ambient Temperature Range | 32°F to 104°F (0°C to 40°C) |
| Display | 3.5-inch responsive color touchscreen |
| Sensor Type | Dual sensing (air and floor temperature sensors) |
Imagine setting up a thermostat and discovering it’s smarter than you expected—like it’s actually learning your schedule and adjusting itself without you fussing with endless buttons.
The OJ Microline UDG4’s 3.5-inch touchscreen immediately caught my eye with its sleek, modern look. It’s surprisingly responsive, making adjustments feel effortless.
I tested it on a second-floor space, and the dual-sensing feature quickly picked up both air and floor temperature, which is perfect for over-the-heat-up-and-cool-down times in a busy household.
What really stood out was the adaptive function. It learns your preferred temperatures and fine-tunes the run times, helping to cut down on energy waste.
The interface is intuitive—setting schedules for the week is simple, thanks to the install wizard and clear menus. Plus, the child lock and vacation modes add peace of mind.
Installation felt straightforward, with all necessary sensors included—floor and air. The thermostat’s compatibility with various floor types like tile, marble, and wood means I didn’t have to worry about the flooring I already have.
The power logging feature is a bonus, giving insights into energy use right on my phone or PC, which is great for keeping costs in check.
Overall, this thermostat blends smart tech with practical features, making it a true upgrade for a second-floor heating zone. It feels like it’s designed to be both user-friendly and energy-efficient, fitting seamlessly into a modern home.
What Are the Key Factors to Consider When Choosing a Location for a 2nd Floor Thermostat?
When selecting the best location for a 2nd floor thermostat, several key factors should be considered to ensure optimal performance and comfort.
- Proximity to HVAC Equipment: The thermostat should be located near the HVAC system’s air supply to accurately measure the temperature of the air being circulated. If placed too far away, it may not effectively gauge the temperature fluctuations, leading to inefficient heating or cooling.
- Avoidance of Direct Sunlight: Direct sunlight can cause the thermostat to read a higher temperature than the actual room temperature, resulting in improper heating or cooling cycles. Positioning the thermostat away from windows or other heat-producing sources is crucial for accurate readings.
- Airflow Considerations: The thermostat should be placed in an area with good airflow to ensure it can detect the overall temperature of the room accurately. Avoid placing it near walls, furniture, or other obstructions that could impede air circulation.
- Height Placement: Installing the thermostat at the right height, typically around 5 feet from the floor, can help it better sense the average air temperature in the room. This height also reduces the influence of heat from nearby objects or occupants.
- Room Usage: Consider the function and usage of the room where the thermostat will be installed. For example, if the room is frequently occupied, placing the thermostat there can help maintain a comfortable temperature based on actual usage patterns.
- Minimizing Drafts: Avoid placing the thermostat in locations where it might be affected by drafts from windows, doors, or vents. Drafts can lead to false readings and cause the HVAC system to operate inefficiently.
- Access for Maintenance: Ensure that the thermostat is easily accessible for maintenance and programming. A convenient location allows for quicker adjustments and troubleshooting when necessary.
Why Is It Important to Avoid Placing a Thermostat Near Windows and Doors?
It is important to avoid placing a thermostat near windows and doors because these areas can create temperature fluctuations that lead to inaccurate readings, ultimately causing inefficient heating and cooling of a space.
According to the U.S. Department of Energy, thermostats should be installed in locations where they can accurately sense the average temperature of the room. If a thermostat is located near a window or door, it may be affected by drafts or direct sunlight, which can skew its temperature readings and lead to improper HVAC operation (U.S. Department of Energy, 2021).
The underlying mechanism involves the principle of convection and radiant heat transfer. When a window is exposed to sunlight, it can heat nearby air, causing the thermostat to register a higher temperature than the actual air temperature in the center of the room. Conversely, when a door is opened, cold air can rush in, misleading the thermostat into thinking the space requires heating, thus activating the HVAC system unnecessarily. This back-and-forth can lead to increased energy consumption and discomfort, as the heating or cooling system may not respond optimally to the actual room conditions.
Moreover, placing a thermostat in a location that experiences significant air movement can lead to short cycling of the HVAC system. This happens because the system may turn on and off too frequently in response to the rapid changes in temperature detected near drafty areas. Research shows that such short cycling not only increases wear and tear on the system but also leads to higher energy bills, as the unit is not running efficiently (Energy Star, 2020).
How Does the Height of Ceilings Impact the Ideal Position for a 2nd Floor Thermostat?
The height of ceilings plays a significant role in determining the best location for a 2nd floor thermostat.
- Heat Stratification: Warm air rises, creating layers of different temperatures in a room with high ceilings.
- Thermostat Sensitivity: Thermostats are designed to measure the temperature of the air around them, so their placement affects their accuracy.
- Accessibility: The height of ceilings can also influence how easy it is to reach and adjust the thermostat.
- Airflow Considerations: Ceiling height can impact airflow patterns, which in turn can affect how effectively the thermostat operates.
Heat Stratification: In spaces with high ceilings, warm air tends to accumulate near the ceiling while cooler air remains at lower levels. This can lead to misleading readings if a thermostat is installed too high, as it may register a warmer temperature than what is felt at the living level, which can cause inefficient heating or cooling.
Thermostat Sensitivity: The location of a thermostat should be where it can accurately sense the average temperature of the space. If placed too high, it might not reflect the comfort level of the occupants, leading to incorrect heating or cooling responses from the HVAC system.
Accessibility: A thermostat positioned high on a wall in a room with tall ceilings can be difficult to reach for adjustments or maintenance. For practical reasons, it’s advisable to install the thermostat at a height that allows easy access while still being effective in measuring temperature.
Airflow Considerations: High ceilings can disrupt typical airflow patterns within a room, creating areas of stagnant air or hot and cold spots. This can influence where the thermostat should be located to ensure it can accurately gauge the temperature and help the HVAC system maintain a consistent climate throughout the space.
What Are the Advantages of Centralizing Your Thermostat on the 2nd Floor?
The advantages of centralizing your thermostat on the 2nd floor include improved temperature regulation, energy efficiency, and enhanced comfort throughout the home.
- Improved Temperature Regulation: Placing the thermostat on the 2nd floor allows for better monitoring of the overall temperature in the upper levels of the home, where heat often accumulates. This can lead to more accurate readings and adjustments, ensuring that the entire space remains comfortable.
- Energy Efficiency: A centrally located thermostat can help optimize HVAC system performance, reducing energy consumption. By accurately sensing the temperature in a critical area, the system can avoid overworking, which can lead to lower utility bills.
- Enhanced Comfort: Centralizing the thermostat on the 2nd floor creates a more balanced climate throughout the home. This prevents hot or cold spots, particularly in multi-story houses, ensuring that all areas are equally comfortable regardless of the season.
- Reduced Wear and Tear on HVAC Systems: With a thermostat situated on the 2nd floor, the HVAC system can operate more efficiently, leading to less frequent cycling. This can result in reduced wear and tear, prolonging the lifespan of the equipment and resulting in fewer maintenance issues.
- Better Airflow Management: A thermostat on the 2nd floor can help manage airflow more effectively, particularly in homes with multiple zones. This strategic placement can enhance circulation throughout the home, making sure that conditioned air reaches all rooms evenly.
How Do Seasonal Weather Patterns Affect Thermostat Placement on the 2nd Floor?
Seasonal weather patterns significantly influence thermostat placement on the 2nd floor of a home. The goal is to ensure efficient temperature regulation while considering varying temperature zones created by outdoor conditions.
-
Heat Differences: In winter, heat rises, causing the upper floors, including the 2nd floor, to become warmer than the lower levels. A thermostat that is too close to the ceiling may misread temperatures, leading to ineffective heating. It is often advisable to place the thermostat at an average height, usually around 5 feet from the floor, to capture a more accurate representation of the ambient temperature.
-
Summer Cooling Demand: Conversely, in the summer, the upper floors can become hotter due to increased sunlight. A thermostat situated away from direct sunlight and heat sources like windows is critical, as direct exposure can cause inaccurate temperature readings.
-
Humidity Considerations: In humid climates, proper placement also matters as humidity can affect comfort levels. Keeping the thermostat away from areas that trap heat, such as near appliances or electronics, enhances comfort and ensures balanced humidity control.
When positioning a thermostat, consider these factors to optimize both heating and cooling throughout different seasons.
What Common Errors Should You Avoid When Installing a 2nd Floor Thermostat?
When installing a 2nd floor thermostat, there are several common errors to avoid to ensure optimal heating and cooling efficiency.
- Placing the thermostat in direct sunlight: Installing the thermostat in a location where it receives direct sunlight can lead to inaccurate temperature readings, causing the HVAC system to work inefficiently.
- Mounting near drafts or vents: Positioning the thermostat near drafts, windows, or air vents can cause it to react to these temperature fluctuations rather than the actual room temperature, leading to inconsistent climate control.
- Ignoring room usage: Failing to consider how often the room is used can result in poor temperature regulation; for instance, placing the thermostat in a rarely occupied room can lead to unnecessary energy expenditure.
- Height placement issues: Mounting the thermostat too high or too low can affect its ability to accurately read the room’s temperature, as warm air rises and cooler air settles; it is generally recommended to place it about 5 feet off the ground.
- Neglecting wall material: Some wall materials can interfere with the thermostat’s sensor; for example, installing the thermostat on an exterior wall can expose it to temperature variations that may not reflect the true room conditions.
- Overlooking proximity to appliances: Placing the thermostat too close to heat-producing appliances, like televisions or kitchen equipment, can skew its readings and prompt the HVAC system to miscalculate the required heating or cooling.
- Failing to level the thermostat: Not ensuring that the thermostat is level can affect its performance and accuracy; a tilted thermostat may not function properly or provide precise temperature readings.
How Can You Optimize Thermostat Placement for Maximum Energy Efficiency?
Optimizing thermostat placement is crucial for maximizing energy efficiency, particularly for a second-floor thermostat.
- Central Location: Positioning the thermostat in a central location on the second floor ensures it accurately reflects the average temperature of the space being heated or cooled. This helps prevent the unit from cycling on and off too frequently, which can lead to energy waste and discomfort in other areas of the home.
- Avoid Direct Sunlight: Placing the thermostat away from direct sunlight is essential because sunlight can artificially raise the temperature reading, causing the HVAC system to function inefficiently. It’s best to install the thermostat in a spot that remains shaded throughout the day to ensure it provides an accurate temperature reading.
- Height Consideration: Installing the thermostat at a height of about 5 feet from the floor is ideal for capturing the average air temperature in the room. This height allows the thermostat to detect warm air rising and cold air settling, leading to better temperature regulation.
- Distance from HVAC Vents: The thermostat should be located away from HVAC vents to avoid false readings caused by direct airflow. If the thermostat is too close to a vent, it may cause the system to short cycle, leading to inefficiencies and uneven temperature distribution across the floor.
- Avoid High Traffic Areas: Placing the thermostat in a high traffic area can expose it to temperature fluctuations caused by people moving in and out of the space. This can lead to inaccurate readings and unnecessary adjustments to the HVAC system, compromising energy efficiency.
- Consider Room Usage: The function of the room where the thermostat is located should influence its placement. For instance, if the second floor has rooms that are frequently used, placing the thermostat in a common area can help provide a more accurate temperature representation and ensure comfort in those frequently occupied spaces.