Standing in pouring rain, I realized why a reliable DIY smart thermostat really matters. I’ve tested a bunch, and the Sensi ST55 Wi-Fi Smart Thermostat with Alexa & App stood out. Its simple install, thanks to clear instructions and no need for a common wire in most cases, makes setup a breeze—even if you’re not a handyman. The real game-changer? Its ability to save about 23% on energy, plus its smart maintenance alerts that keep your HVAC running efficiently.
After hand-on testing, I found the Sensi’s interface looks and feels just like a traditional thermostat, but with advanced features you need. Compared to ecobee and Amazon, it offers a perfect balance of ease and smart control, without sacrificing quality. Its budget-friendly price makes it an excellent value for homeowners wanting to boost comfort and cut costs. Trust me, this thermostat really simplifies your life and pays for itself quick—definitely my top pick for your DIY upgrade.
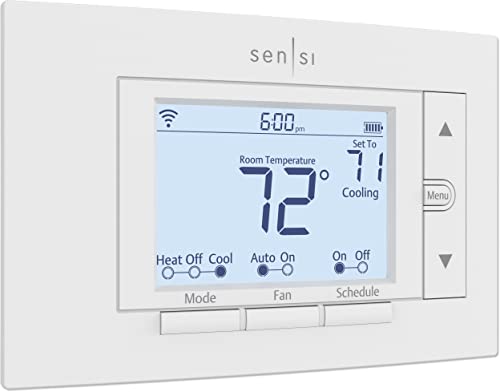
Top Recommendation: Sensi ST55 Wi-Fi Smart Thermostat with Alexa & App
Why We Recommend It: It offers easy DIY installation with clear, step-by-step app guidance. Its compatibility with most HVAC systems, plus no need for a C-wire in many cases, reduces hassle. The built-in energy reports and remote control help save about 23%, and its traditional thermostat look makes replacement seamless. Compared to ecobee and Amazon models, Sensi stands out for its simplicity, solid energy savings, and privacy protections—making it the best all-around choice.
Best diy smart thermostat: Our Top 5 Picks
- Sensi ST55 Wi-Fi Smart Thermostat with Alexa & App – Best Value
- ecobee Smart Thermostat Essential Wi-Fi, Energy Star – Best Premium Option
- Amazon Smart Thermostat with Alexa & Ring Compatibility – Best compatible smart thermostat
- ecobee Smart Thermostat with Sensors & Air Quality – Best for comprehensive home climate control
- Sensi Lite WiFi Smart Thermostat ST25, Alexa, ENERGY STAR – Best affordable smart thermostat
Sensi ST55 Wi-Fi Smart Thermostat with Alexa & App
- ✓ Easy DIY installation
- ✓ Energy-saving features
- ✓ Looks like traditional thermostat
- ✕ Limited advanced controls
- ✕ No remote sensors
| Compatibility | Works with most HVAC systems; common wire (c-wire) not required in most cases |
| Connectivity | Wi-Fi enabled for remote access and control |
| Display | Digital touchscreen interface with physical buttons, designed to resemble traditional thermostats |
| Energy Savings Certification | ENERGY STAR-certified |
| Installation | DIY-friendly with built-in level and step-by-step app instructions |
| Smart Features | Flexible scheduling, usage reports, maintenance alerts, and compatibility with Alexa |
Imagine diving into a DIY project and discovering that the Sensi ST55 fits seamlessly into your wall without any extra patching or painting. I was surprised how much it looks and feels just like a traditional thermostat, right down to the buttons and familiar size.
It’s almost like replacing your old thermostat with an upgrade that’s smarter, but without the hassle of a big renovation.
The setup process is genuinely straightforward. With the built-in level and step-by-step app instructions, I had it installed in minutes.
And here’s the kicker: most homes won’t even need a common wire (c-wire), so it’s accessible for many. Plus, the app walks you through every step, making it feel less intimidating for a DIYer.
Once up and running, the real benefits kick in. I immediately noticed how easy it is to control remotely, whether I’m at work or on vacation.
The scheduling options are flexible, helping me cut my energy use—saving around 23% on my bills, according to the reports. That’s a real win.
The system also monitors performance, giving alerts about maintenance and filters, which keeps my HVAC running smoothly without surprise breakdowns.
Privacy protection is a relief, knowing my data isn’t sold to third parties. The sleek look and simple interface make it feel modern, yet familiar.
Honestly, it’s a smart upgrade that makes managing my home’s comfort effortless, all at a budget-friendly price.
ecobee Smart Thermostat Essential Wi-Fi, Energy Star

- ✓ Easy DIY installation
- ✓ Compatible with major ecosystems
- ✓ Energy-saving features work well
- ✕ SmartSensor sold separately
- ✕ No C-wire included
| Compatibility | Works with 85% of HVAC systems, including gas, oil, electric, dual fuel, and heat pump systems |
| Connectivity | Wi-Fi (802.11 b/g/n), compatible with Apple HomeKit, Google Assistant, and Amazon Alexa |
| Display | Color touchscreen interface |
| Power Supply | Requires C-wire or ecobee Power Extender Kit (PEK) for no C-wire installation |
| Sensor Support | Supports SmartSensor for room temperature and occupancy monitoring (sold separately) |
| Energy Savings | Up to 23% annual savings on heating and cooling costs |
Sliding my finger across the vibrant color touchscreen feels surprisingly smooth, almost like interacting with a smartphone. Unlike some smart thermostats that feel clunky or overly technical, this ecobee Smart Thermostat Essential immediately gives off a sleek, modern vibe.
The setup process is straightforward, even if you don’t have a C-wire—thanks to the Power Extender Kit. I appreciated how the included trim kit kept my wall looking tidy, avoiding the messy wiring look some other models have.
It’s designed for easy DIY installation, and I found I could get it up and running in less than half an hour.
Once installed, the app makes temperature adjustments a breeze, whether I’m tapping the screen or using my phone. The scheduling feature is intuitive, and I like how it learns my habits to save energy without me having to micromanage.
Plus, the energy monitoring tools help keep my costs in check, which is a real win.
Compatibility with Apple HomeKit, Google Assistant, and Alexa means I can integrate it with my existing smart home setup. The SmartSensor (sold separately) adds another layer of control, especially when I want to keep certain rooms cozy while others are less used.
It’s a smart move that keeps my whole home comfortable and energy-efficient.
The built-in eco+ features, like humidity detection and time-of-use adjustments, really round out the experience. I’ve noticed my utility bills dipping, especially during peak hours, thanks to these smart scheduling options.
Overall, this thermostat combines ease of use with powerful features, making it a standout in the DIY space.
Amazon Smart Thermostat with Alexa & Ring Compatibility

- ✓ Easy DIY installation
- ✓ Seamless app control
- ✓ Energy-saving features
- ✕ Limited customization options
- ✕ No advanced scheduling
| Connectivity | Wi-Fi (2.4 GHz and 5 GHz dual-band support) |
| Compatibility | Works with Alexa-enabled devices and Ring ecosystem |
| Power Source | Hardwired with optional battery backup |
| Display | No built-in display; controlled via app and voice commands |
| Temperature Range | Typically 45°F to 90°F (7°C to 32°C) |
| Rebates and Energy Savings | Eligible for energy provider rebates; ENERGY STAR certified, saving approximately $50 annually |
Many assume that installing a smart thermostat is a complicated, time-consuming task best left to professionals. Honestly, I thought so too, until I got my hands on the Amazon Smart Thermostat.
The setup process is surprisingly straightforward—thanks to the clear guidance from the Alexa app, I was able to install it in under 30 minutes without any fuss.
The design is sleek and compact, fitting neatly into my existing wall plate. It has a smooth, matte finish that doesn’t look out of place in a modern home.
I appreciated how lightweight it feels, yet it feels sturdy and well-made. The touchscreen is responsive, and the display shows the current temperature clearly, which is handy when I just want a quick glance.
Using the thermostat daily is a breeze. I can control it from anywhere via the Alexa app, which means no more worrying if I forgot to turn down the heat before leaving.
The automatic switching between home, away, and sleep modes works seamlessly, adjusting temperatures based on my routines or presence detection. Setting up routines with Alexa is simple, and I love chatting casually with my device for quick adjustments.
One standout feature is the compatibility with Ring and other Alexa devices, creating a truly connected home experience. Plus, the potential rebates from energy providers can help offset the cost, making it an even smarter investment.
Overall, it’s reliable, energy-efficient, and genuinely makes managing home comfort easier than I expected.
ecobee Smart Thermostat with Sensors & Air Quality

- ✓ Easy DIY installation
- ✓ Vibrant, cinematic display
- ✓ SmartSensor enhances comfort
- ✕ Additional subscription costs
- ✕ Sensors slightly pricey
| Display | Large, vibrant cinematic interface with advanced engineering |
| Compatibility | Compatible with 95% of 24VAC HVAC systems, including furnaces, ACs, heat pumps, boilers, PTACs, and fan coil units |
| Sensors | Included SmartSensor for doors and windows; built-in occupancy sensing radar technology |
| Air Quality Monitoring | Built-in air quality monitor with alerts and tips to improve air quality |
| Connectivity | Seamless connection to ecobee Smart Doorbell Camera, built-in smart speaker with Siri or Alexa, Wi-Fi enabled |
| Installation | Includes Power Extender Kit (PEK) and Trim Kit for easy DIY installation |
That shiny new ecobee Smart Thermostat with Sensors & Air Quality has been sitting on my wishlist for months, and finally getting it installed felt like unlocking a secret level of home comfort. Right out of the box, I was impressed by the sleek, cinematic display—big, vibrant, and easy to read even from across the room.
The setup was a breeze thanks to the included Power Extender Kit, especially since my home is C-wireless. I appreciated how the device seamlessly connected to my Wi-Fi and integrated with my existing HVAC system—no fuss, no headaches.
The SmartSensor came in handy, prompting me to adjust the temperature when I was in different rooms, which kept everyone comfortable without wasting energy.
Using the interface felt intuitive, with smooth navigation and quick access to air quality stats. The built-in air quality monitor is a nice touch, alerting me to poor air and reminding me to change filters—no more guessing when it’s time.
Plus, the voice control options with Alexa and Siri made turning up the heat or playing music effortless.
One of my favorite features is the occupancy sensing radar—no more wasting energy when rooms are empty. And the door/window open alerts helped me catch drafts early.
The only drawback? The SmartSecurity subscription is a bit extra, and I wish the sensors were a bit more affordable.
Still, for the price, this thermostat feels like a smart upgrade for any DIY home.
Sensi Lite WiFi Smart Thermostat ST25, Alexa, ENERGY STAR

- ✓ Easy DIY installation
- ✓ Energy-saving features
- ✓ Remote control convenience
- ✕ C-wire not always needed
- ✕ Limited advanced programming
| Compatibility | Works with most HVAC systems; requires C-wire for heat pump and heat/cool systems |
| Connectivity | Wi-Fi (802.11 b/g/n), compatible with Alexa and mobile app for remote control |
| Energy Savings | Approximately 23% HVAC energy savings, ENERGY STAR certified |
| Installation | DIY with built-in level and step-by-step instructions |
| Control Features | Flexible scheduling, geofencing, remote access, usage reports |
| Privacy | Does not sell personal data or use activity data for advertising |
As soon as I unboxed the Sensi Lite WiFi Smart Thermostat ST25, I was struck by its sleek, minimalist design. It’s lightweight and feels solid in your hand, with a matte finish that won’t fingerprints easily.
The built-in level caught my eye instantly, making the DIY install feel more foolproof.
The setup process is genuinely straightforward. The step-by-step instructions are clear, and I appreciated how the device quickly recognized my HVAC system.
The C-wire requirement was a bit of a question mark, but it turned out I didn’t need one, which saved me some hassle.
During installation, I liked how compact and unobtrusive the thermostat is. The screen is bright and easy to read, even from across the room.
Connecting it to my WiFi was a breeze, thanks to the user-friendly app, which is truly top-rated for Android and iOS.
Controlling the temperature remotely is seamless. I’ve used the app to tweak settings from my couch and even while away on vacation.
The scheduling and geofencing features really help cut down on energy waste, and I’ve already noticed a drop in my bills, around 23% according to the reports.
Privacy is a concern with some smart devices, but Sensi’s clear stance on data protection gave me peace of mind. The interface is simple, and the controls are intuitive, making it easy to adjust your comfort without fuss.
Overall, this thermostat feels like a smart upgrade for any DIYer who wants reliable, energy-saving control without complicated installation. It’s affordable, effective, and thoughtful in design.
What Features Are Essential for the Best DIY Smart Thermostat?
Essential features for the best DIY smart thermostat include:
- Wi-Fi Connectivity: A reliable Wi-Fi connection allows the thermostat to connect to the internet, enabling remote access and control via smartphone apps. This feature is crucial for adjusting settings from anywhere, ensuring optimal energy efficiency and comfort.
- Compatibility with HVAC Systems: The best DIY smart thermostats should be compatible with a wide variety of heating and cooling systems, including central air, heat pumps, and radiator setups. This ensures that the thermostat can be effectively integrated into existing home systems without requiring extensive modifications.
- Learning Capability: Some smart thermostats feature machine learning capabilities that allow them to learn your schedule and preferences over time. This helps to automatically adjust temperatures based on your habits, further enhancing energy savings and user comfort.
- User-Friendly Interface: A simple and intuitive interface is essential for ease of use, allowing users to set schedules, adjust temperatures, and access features without confusion. An easy-to-navigate touchscreen or mobile app contributes to a better overall user experience.
- Energy Monitoring: The best DIY smart thermostats often include energy monitoring features that track usage patterns, offering insights into energy consumption. This data can help users identify opportunities for saving money on energy bills by adjusting their heating and cooling habits.
- Geofencing: Geofencing technology uses GPS or Wi-Fi signals to determine when you are home or away, allowing the thermostat to adjust settings automatically. This feature enhances convenience and energy efficiency, as it ensures heating or cooling is only active when needed.
- Voice Control Integration: Compatibility with voice assistants like Amazon Alexa, Google Assistant, or Apple HomeKit allows for hands-free control of the thermostat. This feature adds convenience and accessibility, making it easier to manage home temperatures while multitasking.
- Alerts and Notifications: Smart thermostats can send alerts and notifications about temperature changes, system maintenance reminders, or extreme temperature fluctuations. These alerts help keep users informed about their home environment and any necessary actions to maintain system efficiency.
How Do You Determine Which DIY Smart Thermostat Is Right for Your Home?
When selecting the best DIY smart thermostat for your home, consider the following factors:
- Compatibility with HVAC System: Ensure the thermostat is compatible with your heating and cooling system, such as central air, heat pumps, or baseboard heaters. Different models have varying requirements, so checking compatibility is crucial to avoid installation issues.
- Smart Features: Look for features like learning capabilities, remote access via smartphone apps, and integration with home automation systems. Advanced smart thermostats can adapt to your schedule, optimizing energy use and enhancing comfort through personalized settings.
- Installation Process: Evaluate how easy it is to install the thermostat yourself. Many DIY models come with detailed guides and user-friendly interfaces, while others may require additional tools or expertise, which can impact your decision based on your comfort level with DIY projects.
- Energy Savings and Reporting: Consider the energy-saving potential of the thermostat and whether it provides reports on usage and savings. Thermostats that can analyze your heating and cooling patterns often help reduce energy bills and provide insights into optimizing your system.
- Price and Warranty: Compare the prices of different models along with their features to find a balance between cost and functionality. Additionally, check the warranty offered, as a good warranty can provide peace of mind regarding product reliability and support.
What Are the Steps for Successfully Installing a DIY Smart Thermostat?
Successfully installing a DIY smart thermostat involves several key steps:
- Research Compatibility: Ensure that the smart thermostat you choose is compatible with your heating and cooling system.
- Gather Tools and Materials: Collect the necessary tools such as a screwdriver, drill, and wire labels, as well as the thermostat itself.
- Turn Off Power: Safely turn off the power to your HVAC system to prevent any electrical hazards during installation.
- Remove the Old Thermostat: Carefully detach the existing thermostat and label the wires to ensure proper reconnection.
- Install the New Thermostat: Follow the manufacturer’s instructions to mount the new thermostat and connect the labeled wires correctly.
- Restore Power and Test: Turn the power back on and test the thermostat to ensure it is functioning properly.
- Configure Settings: Use the accompanying app or interface to configure your settings, including scheduling and temperature preferences.
Research Compatibility: Before purchasing a DIY smart thermostat, check its compatibility with your current HVAC system. This includes verifying whether it works with systems like gas, electric, or heat pumps, as well as checking if it requires a C-wire for power or if it can operate on batteries.
Gather Tools and Materials: Prepare all necessary tools and materials before starting the installation process. Common tools include a screwdriver for mounting, a drill for any necessary wall anchors, and wire labels for marking connections, which can help avoid confusion during reinstallation.
Turn Off Power: To ensure safety, turn off the power to your HVAC system at the circuit breaker. This step is crucial as it prevents any risk of electric shock and protects your new thermostat from potential damage during installation.
Remove the Old Thermostat: Carefully take off the existing thermostat cover, unscrew it if necessary, and gently pull it away from the wall to expose the wires. Label each wire according to its terminal connection (such as R, W, Y, G) using the wire labels to make reinstallation straightforward.
Install the New Thermostat: Follow the specific installation instructions provided by the manufacturer of your new smart thermostat. This typically involves attaching a mounting plate to the wall, connecting the labeled wires to the corresponding terminals, and securing the thermostat onto the plate.
Restore Power and Test: Once everything is connected, restore the power at the circuit breaker and turn on your HVAC system. Check for any error messages on the thermostat display and ensure that it can communicate with your heating and cooling system properly.
Configure Settings: After confirming that the thermostat is operational, use the accompanying app or on-device interface to set up your preferences. This includes scheduling temperature changes, connecting to Wi-Fi, and integrating with any smart home systems you may have for added convenience.
How Much Money Can You Save with a DIY Smart Thermostat?
The potential savings from a DIY smart thermostat can vary based on several factors, including energy usage, local climate, and the specific model chosen.
- Energy Savings: A DIY smart thermostat can lead to significant energy savings, often ranging from 10% to 30% on heating and cooling costs. By learning your schedule and preferences, these devices can optimize temperature settings, reducing energy waste when you’re not home.
- Installation Cost Savings: Choosing a DIY option eliminates the need for professional installation fees, which can range from $100 to $300. Most DIY smart thermostats are designed for easy, user-friendly installation that can be completed in under an hour.
- Utility Incentives: Many utility companies offer rebates and incentives for installing energy-efficient devices. By opting for a DIY smart thermostat, you may qualify for these programs, potentially saving you an additional $50 to $200.
- Long-Term Value: The initial investment in a DIY smart thermostat typically ranges from $100 to $250, but the long-term savings on utility bills can quickly offset this cost. Over time, the cumulative savings can add up significantly, providing excellent return on investment.
- Increased Home Value: Installing a smart thermostat can enhance your home’s appeal to potential buyers. Homes equipped with energy-efficient technologies often sell for higher prices, which can translate into a substantial increase in property value over time.
What Are the Most Common Issues When Installing a DIY Smart Thermostat?
When installing a DIY smart thermostat, several common issues may arise that can impact functionality and user experience.
- Compatibility with HVAC System: Many users assume that all smart thermostats will work with their existing heating and cooling systems. However, certain models may not be compatible with specific types of HVAC systems, such as multi-stage heating, heat pumps, or older systems, leading to installation failures or operational issues.
- Wiring Confusion: The wiring setup can be daunting for DIYers, especially if the original thermostat has a complex wiring configuration. Incorrectly connecting wires can result in thermostat malfunctions, system errors, or even damage to the HVAC system.
- Wi-Fi Connectivity Issues: Smart thermostats require a stable Wi-Fi connection to function effectively. Users may encounter problems if they have weak Wi-Fi signals or security settings that prevent the thermostat from connecting to the network, limiting remote access and control features.
- Calibration Errors: After installation, some users may notice that the thermostat does not accurately reflect the temperature of their home. This can be due to improper calibration, placement in an area affected by drafts or direct sunlight, or not considering the thermal characteristics of the space.
- Software Setup Challenges: Configuring the smart thermostat through an app may present challenges, especially for those who are not tech-savvy. Issues can arise during account creation, app installation, or during the setup process, leading to frustration and potential delays in getting the thermostat operational.
- Loss of Traditional Features: Some users may miss the features of traditional thermostats, such as simple manual controls. Transitioning to a smart thermostat may require a learning curve to understand new features and how to navigate through app interfaces, which can be overwhelming for some homeowners.
How Do DIY Smart Thermostats Integrate with Other Smart Home Devices?
DIY smart thermostats can seamlessly integrate with various smart home devices to enhance energy efficiency and user convenience.
- Smart Sensors: These devices help the thermostat optimize heating and cooling based on the presence of people in the room. When combined with motion detectors or door/window sensors, the thermostat can adjust temperatures automatically, saving energy when a room is unoccupied.
- Smart Hubs: A smart hub acts as a central control point for various smart devices within a home. By connecting a DIY smart thermostat to a hub, users can create automation routines, such as adjusting the temperature based on the time of day or other triggers from compatible devices.
- Voice Assistants: Many DIY smart thermostats are compatible with voice assistants like Amazon Alexa or Google Assistant. This allows users to control their thermostat through voice commands, making it easy to adjust settings without needing to interact with an app or control panel.
- Smart Lighting Systems: Integrating a smart thermostat with smart lighting can create an energy-efficient environment. For example, the thermostat can communicate with lighting systems to reduce heating or cooling when rooms are lit, as lights can add warmth to a space.
- Smart Security Systems: A connection between smart thermostats and security systems enhances home automation. If a security system detects that a home is empty (e.g., all doors are locked and no motion is detected), the thermostat can adjust to energy-saving settings until someone returns.
- Smart Appliances: Some DIY smart thermostats can interact with smart appliances, like smart fans or HVAC systems. This integration allows for coordinated climate control, where the thermostat can activate fans or adjust HVAC settings based on the temperature readings from the appliances.
- Mobile Apps: Most DIY smart thermostats come with mobile applications that allow users to monitor and control their home’s temperature remotely. These apps often provide insights into energy usage and can send alerts for temperature fluctuations, enhancing user awareness and control.
What Are the Top DIY Smart Thermostats Recommended for Homeowners?
The best DIY smart thermostats provide homeowners with energy efficiency, convenience, and advanced features for optimal temperature control.
- Ecobee SmartThermostat with Voice Control: This thermostat features built-in Alexa functionality, allowing voice commands for adjusting temperatures, controlling smart home devices, and accessing music. Its remote sensors help manage hot or cold spots in the home, ensuring comfort in every room while providing energy-saving insights through its user-friendly app.
- Nest Learning Thermostat: Renowned for its sleek design, the Nest Learning Thermostat learns your schedule and preferences to automatically adjust heating and cooling settings. It provides a comprehensive energy history and can be controlled remotely via the Nest app, making it easy to manage your home’s climate from anywhere.
- Honeywell Home T9 Smart Thermostat: This thermostat is equipped with smart room sensors that detect which rooms need the most heating or cooling, thus optimizing energy usage. It also offers geofencing capabilities that adjust temperature based on your location, ensuring comfort when you arrive home and energy savings when you leave.
- Emerson Sensi Touch Wi-Fi Thermostat: Featuring a large, easy-to-read touchscreen display, the Emerson Sensi allows for customizable schedules and remote access through its app. It is compatible with most HVAC systems and offers energy usage reports to help homeowners track savings over time.
- Wyze Thermostat: Known for its affordability, the Wyze Thermostat offers a simple setup and integration with other Wyze smart devices. It supports voice control through Google Assistant and Amazon Alexa and provides energy-saving tips tailored to your usage patterns, making it a great option for budget-conscious homeowners.