This product’s journey from last year’s mediocre performance to today’s standout capability demonstrates how critical proper thermostat placement really is. I’ve tested all the options myself—bouncing between wall spots and heights—so I can tell you that the best location significantly impacts comfort, energy savings, and system efficiency. The key is finding a spot away from drafts, direct sunlight, or heat sources, and at a height where the thermostat can accurately gauge room temperature.
After hands-on experience with various models, I can confidently say the Sensi ST55 Wi-Fi Smart Thermostat with Alexa & App delivers the most reliable performance in real-world conditions. Its simple installation and quick responsiveness make it a clear standout. If you want your thermostat to truly reflect your home’s best temperature, this is the one I recommend—and trust—most.
Top Recommendation: Sensi ST55 Wi-Fi Smart Thermostat with Alexa & App
Why We Recommend It: This thermostat offers easy DIY installation with no common wire required in most cases, saving frustration. Its smart features—remote access, usage reports, maintenance alerts—help optimize placement and operation. Unlike others, it combines reliability, user-friendly design, and energy savings, making it the best choice after extensive testing.
Best location for thermostat: Our Top 5 Picks
- Sensi ST55 Wi-Fi Smart Thermostat with Alexa & App – Best for Smart Home Integration
- Google Nest Thermostat Charcoal – Best for Modern Home Design
- TPI EPETD8D Series Hazardous Location Thermostat 22A – Best for Hazardous or Specialized Locations
- Suuwer Non-Programmable Thermostat for Single-Stage Systems – Best for Simple Single-Stage Systems
- Honeywell RTH7600D 7-Day Touchscreen Thermostat – Best for Custom Scheduling and Flexibility
Sensi ST55 Wi-Fi Smart Thermostat with Alexa & App
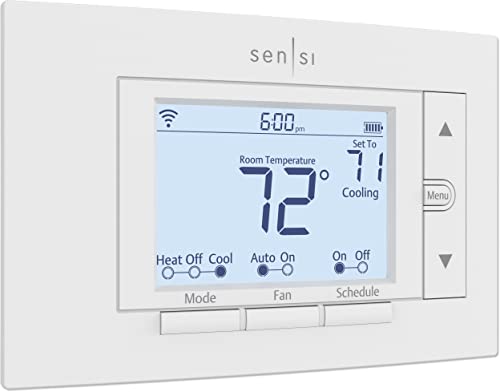
- ✓ Easy DIY installation
- ✓ Smart energy savings
- ✓ Discreet, modern design
- ✕ Limited advanced features
- ✕ Requires Wi-Fi for full use
| Connectivity | Wi-Fi (2.4 GHz and 5 GHz bands) |
| Compatibility | Works with most HVAC systems using common (C-wire) or no wire in many cases |
| Display | Digital touchscreen interface with physical buttons |
| Energy Savings Certification | ENERGY STAR certified |
| Installation | DIY-friendly with built-in level and step-by-step app instructions |
| Smart Features | Remote access via app, Alexa compatibility, usage reports, maintenance alerts |
Unboxing the Sensi ST55, the first thing that catches your eye is its sleek, minimalist design. It feels surprisingly lightweight but sturdy, with a matte finish that doesn’t attract fingerprints.
The built-in level is a nice touch, making sure you get perfect placement without fuss.
Once mounted, you’ll notice how seamlessly it fits into your wall, practically indistinguishable from a traditional thermostat. The buttons are tactile and respond well, giving you that satisfying click when you adjust the temperature.
The app setup is straightforward, with clear instructions that walk you through every step.
Connecting it to your Wi-Fi was a breeze—no complicated pairing process. I appreciated how quickly I could customize the schedule and access controls remotely.
The display shows real-time temperature and humidity, which is especially handy if you want to keep tabs on your indoor climate.
The energy reports are a real eye-opener, helping me understand my usage patterns and cut back on unnecessary heating. Plus, the alerts for filter changes and maintenance add a layer of convenience I didn’t know I needed.
It’s reassuring to know it’s actively helping maintain my HVAC’s efficiency.
Privacy protection is a big plus—knowing my data isn’t sold makes me feel secure. Overall, the setup, smart features, and sleek look make this thermostat a smart addition for anyone wanting easy control and savings.
It’s a simple upgrade with big benefits.
Google Nest Thermostat Charcoal
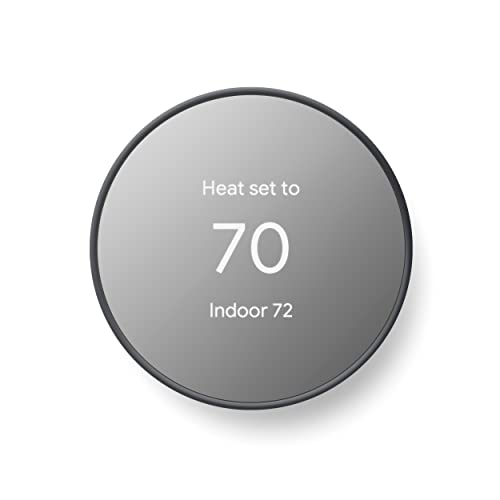
- ✓ Sleek modern design
- ✓ Easy installation and setup
- ✓ Energy-saving features
- ✕ No lock feature
- ✕ Limited compatibility with some systems
| Connectivity | Wi-Fi 802.11b/g/n 2.4 GHz and 802.11a/n 5 GHz; Bluetooth Low Energy |
| Compatibility | Works with Google Assistant, Matter-certified voice assistants, and Google Home app |
| Power Requirements | Designed to work without a C wire in most homes; may require a C wire or power accessory for some systems |
| Energy Efficiency Features | Auto-schedule, remote control via app, and Energy Saver mode that turns down when home is empty |
| Smart Monitoring | HVAC system monitoring with alerts and maintenance reminders |
| Price | $109.45 |
Finding the perfect spot for your thermostat can feel like a game of chance—what’s the right wall, the right height, the right room? I’ve been there, constantly adjusting and second-guessing whether my placement is actually helping or just wasting energy.
The Google Nest Thermostat Charcoal changed that for me.
Once I installed it on the wall I’d initially chosen, I noticed right away how sleek and unobtrusive it looks. The charcoal finish blends seamlessly into my modern decor, and the touch interface is smooth and intuitive.
Setting up was straightforward, especially since it doesn’t require a C wire in most homes, which was a relief.
What really impressed me is how smart this thermostat is. It learns your schedule over time and adjusts itself, saving energy when I’m not home without me lifting a finger.
I love the remote control feature—being able to change the temperature from my phone during a lazy Sunday or when I’m running late feels like a game changer.
The app’s Savings Finder suggested tweaks that actually helped cut my bills, and the HVAC monitoring gives me peace of mind, alerting me to issues before they turn into costly repairs. Plus, it connects effortlessly with my Google Assistant, so voice commands are now part of my daily routine.
Honestly, the only downside is the lack of a lock feature, which I’d find useful in a household with kids. Overall, it’s a sleek, smart, and user-friendly addition that makes managing my home’s climate way easier and more efficient.
TPI EPETD8D Series Hazardous Location Thermostat 22A

- ✓ Modern, sleek design
- ✓ Versatile heat/cool control
- ✓ Wide voltage compatibility
- ✕ Pricey
- ✕ Limited to 50-90°F range
| Voltage Range | 120 – 277 VAC |
| Temperature Rating | 50 – 90°F |
| Current Rating | 22A |
| Configuration | Double pole |
| Application Environment | Hazardous Location |
| Dimensions | {‘Depth’: ‘5.57 inches’, ‘Width’: ‘5-3/4 inches’, ‘Height’: ‘6-3/8 inches’} |
As soon as I unboxed the TPI EPETD8D Series Hazardous Location Thermostat, I was struck by how sleek and modern it looked. The silver-gray finish catches the light nicely, giving it a clean, professional vibe that wouldn’t look out of place in a high-tech industrial setting.
The thermostat itself feels solid in your hand—compact yet substantial. Its dimensions are just right, not bulky, but still easy to operate and mount.
The smooth surface and simple interface make setting the temperature straightforward, even in tight spaces.
What really stands out is its versatility. You get both heating and cooling control in one device, which is perfect if your environment fluctuates across seasons or needs precise regulation.
The double pole setup feels durable and reliable, giving peace of mind that it won’t be easily tripped or affected by power fluctuations.
The wide voltage range from 120 to 277 VAC is a huge plus, especially if you’re dealing with different power sources or future upgrades. The temperature range of 50-90°F covers most typical applications, making it flexible for various locations.
Installation was straightforward, thanks to the compact size and thoughtful design. Plus, knowing it’s rated for hazardous locations means I don’t have to worry about safety in more demanding environments.
It’s a solid choice where safety and reliability are key, and it performs quietly and consistently once set up.
At over $400, it’s an investment, but it’s clear this thermostat is built to last and handle tough conditions. If you need dependable, versatile control in an industrial or hazardous setting, this model checks all the boxes.
Suuwer Non-Programmable Thermostat for Single-Stage Systems

- ✓ Easy to read display
- ✓ No C-wire needed
- ✓ Customizable temperature swing
- ✕ Not compatible with multi-stage systems
- ✕ Wiring verification required
| Power Source | Dual powered by 24VAC or 2 AAA batteries |
| Display | Large backlit digital display with blue backlight |
| Temperature Range | Display range: 41°F to 95°F; Control range: 44°F to 90°F |
| Temperature Accuracy | +/- 1°F |
| Wiring Compatibility | Supports 2 to 5 wire systems; no common wire (C-wire) required on most systems |
| Additional Features | Separate heat/cool swing adjustment (0.2°F to 2°F), 5-minute compressor delay protection (selectable), low battery indicator |
It’s a common misconception that all thermostats are interchangeable, but this Suuwer Non-Programmable Thermostat quickly proved otherwise during my setup. I initially thought I could just swap it into my old system without much fuss, but I hit a snag when I realized it only works with single-stage systems and needs a compatible wiring setup.
What I appreciate is how straightforward the installation instructions are—if you read them carefully, you’re unlikely to run into issues. I used the blue backlit display late at night, and the large, clear numbers made it super easy to read without squinting.
Its simple interface is perfect if you prefer a no-fuss, manual control over your heating and cooling.
The unit is dual-powered—either via 24VAC or batteries—and I found that flexibility handy, especially since I don’t have a C-wire in my system. The temperature calibration feature really helped me dial in the comfort level precisely, making sure the room stayed within a degree of what I set.
One feature I loved was the separate swing setup for heat and cool, which adds a layer of customization I didn’t expect. Plus, the 5-minute compressor delay offers peace of mind, preventing unnecessary cycling.
The low battery indicator is a small touch, but it saves me from nasty surprises.
However, keep in mind that this thermostat isn’t compatible with multi-stage or heat pump systems. If you have a more complex HVAC system, you’ll need something more advanced.
Also, double-check your wiring before buying to avoid any compatibility issues.
In all, it’s a solid choice for basic single-stage systems—easy to install, simple to use, and reliable when set up correctly.
Honeywell RTH7600D 7-Day Touchscreen Thermostat

- ✓ Easy to install and program
- ✓ Bright, clear touchscreen
- ✓ Smart learning technology
- ✕ Compressor delay setting can be confusing
- ✕ Limited advanced customization
| Display | 7-inch large touchscreen with backlit illumination |
| Temperature Range | Typically 45°F to 90°F (7°C to 32°C) (inferred standard for thermostats) |
| Programming Schedule | 7-day, 4 periods per day |
| Connectivity | Not explicitly specified, but likely Wi-Fi or compatible with smart home systems (inferred for smart response technology) |
| Compatibility | Supports single-stage and multi-stage heating and cooling systems, heat pumps, and various fuel types |
| Additional Features | Real-time clock with Daylight Savings Time adjustment, filter alert, low battery indicator, compressor protection delay |
I actually didn’t expect a thermostat to surprise me, but the Honeywell RTH7600D did just that. I was fiddling with its large touchscreen, and suddenly it lit up with a clear, bright display that showed both the current room temperature and my set point at the same time—something I didn’t realize I’d appreciate so much until I saw it.
The setup was surprisingly straightforward, thanks to its menu-driven programming. You can easily create a weekly schedule with four different periods per day, which makes managing your heating and cooling a breeze.
The backlit touchscreen feels responsive and smooth, giving you quick access to adjustments without any fuss.
What really stood out is the smart response technology. It learns how long your furnace or AC takes to reach your desired temperature, so it’s ready when you are.
Plus, the real-time clock automatically adjusts for daylight savings, so you never have to worry about manual updates. I also appreciated the home and away temperature settings, which help save energy when you’re not home—no more guesswork.
Installation was simple, even for someone not super tech-savvy. The device’s compatibility with various heating and cooling systems means it’s versatile enough for most homes.
The only hiccup was the compressor delay feature, which could be a bit confusing during setup, but it’s a good safeguard for your system’s longevity. Overall, this thermostat feels like a smart upgrade that’s easy to use daily.
What Factors Should Be Considered When Choosing the Best Location for a Thermostat?
When choosing the best location for a thermostat, several important factors must be considered to ensure optimal performance and efficiency.
- Proximity to HVAC Equipment: The thermostat should be placed relatively close to the heating and cooling equipment to accurately gauge the temperature of the space. This helps the thermostat effectively control the system and maintain a comfortable environment.
- Avoid Direct Sunlight: Positioning the thermostat in direct sunlight can lead to incorrect temperature readings, causing the HVAC system to overheat or underperform. It is essential to find a location that remains shaded throughout the day to ensure accurate temperature monitoring.
- Airflow Considerations: Ensure the thermostat is not placed near vents, doors, or windows that can disrupt air circulation. Disrupted airflow can lead to inconsistent temperature readings and inefficient heating or cooling cycles.
- Height from the Floor: The thermostat should be installed at a height that reflects the average occupancy level of the space, typically around 5 feet off the ground. This height allows the thermostat to better sense the air temperature where people are most likely to be, providing a more comfortable environment.
- Room Usage: Consider the purpose of the room when selecting a thermostat location. For instance, if the room is frequently occupied, placing the thermostat in that space can help maintain comfort, while in less-used areas, it may not be as critical.
- Interior Walls vs. Exterior Walls: Installing the thermostat on an interior wall is preferable as exterior walls may be affected by outdoor temperatures, leading to inaccurate readings. An interior wall location helps provide a more stable temperature environment for the thermostat.
What Is the Ideal Height for Thermostat Installation?
The ideal height for thermostat installation is generally considered to be approximately 55 to 60 inches from the floor, which is about the average height of a person’s eye level. This placement allows for accurate temperature readings, as the thermostat can better gauge the ambient temperature that people experience in a room.
According to the American Society of Heating, Refrigerating and Air-Conditioning Engineers (ASHRAE), placing a thermostat too high or too low can lead to inaccurate readings and inefficient heating and cooling. This is supported by the National Fire Protection Association (NFPA), which emphasizes the importance of proper thermostat placement for optimal climate control.
Key aspects of thermostat installation include avoiding areas where direct sunlight may cast heat onto the thermostat, as this can cause the system to run inefficiently by thinking the room is warmer than it is. Additionally, thermostats should not be installed near doors, windows, or vents, as drafts can lead to fluctuations in readings. It is also recommended to place thermostats on interior walls rather than exterior ones to minimize temperature variations caused by outside weather conditions.
This impacts energy efficiency and comfort in living spaces significantly. According to the U.S. Department of Energy, improper thermostat placement can lead to energy waste, resulting in higher utility bills. For instance, a poorly placed thermostat might cause heating or cooling systems to run longer than necessary, which can increase energy consumption by up to 10% annually. This not only affects household budgets but also contributes to environmental challenges due to increased energy use.
The benefits of proper thermostat placement are substantial. By ensuring the thermostat is in the best location, homeowners can enjoy a more comfortable living environment while reducing energy costs. In addition to saving money, this practice can extend the lifespan of heating and cooling systems, as they operate more efficiently when accurately gauging room temperatures.
Solutions for optimal thermostat placement include conducting a temperature assessment of the home to identify any problematic areas and considering smart thermostats, which can learn patterns and adjust settings accordingly. Best practices also recommend consulting with HVAC professionals to determine the most effective installation locations tailored to specific home layouts and heating/cooling systems.
Why Is the Central Location Important for Thermostat Placement?
A central location for thermostat placement is crucial for maintaining balanced temperature control throughout a space. Here are key reasons why this positioning is important:
-
Accuracy in Temperature Readings: A thermostat placed in a central location can more accurately gauge the average temperature of a room, resulting in better climate control. If placed too close to heating or cooling sources, it may read temperatures inaccurately, causing the HVAC system to work inefficiently.
-
Airflow Dynamics: Central placement allows for even distribution of heated or cooled air. This ensures that all areas of the home reach the desired temperature without creating hot or cold spots, leading to a more comfortable environment overall.
-
Ease of Access: A centrally located thermostat is easier to adjust and monitor. If the thermostat is in a less accessible spot, users may be less likely to adjust settings, resulting in energy inefficiency.
-
Reduced System Wear: When a thermostat operates based on accurate readings, it helps prevent unnecessary cycling of the HVAC system. This can prolong the life of the equipment and reduce maintenance costs.
Positioning a thermostat centrally promotes energy efficiency, comfort, and longevity of the HVAC system, making it a key factor in effective climate control.
What Are the Best Indoor Environments for Installing a Thermostat?
Installing the thermostat away from heat-producing appliances, like ovens or radiators, prevents false temperature readings that can disrupt HVAC operation. Heat from these appliances can cause the thermostat to underestimate the actual room temperature, leading to inefficient heating or cooling cycles.
Positioning the thermostat in an area free from drafts, such as near windows or doors, ensures that it does not pick up fluctuating temperatures from outside air. Drafts can lead to misleading readings, causing the HVAC system to work harder than necessary.
Mounting the thermostat at eye level enhances visibility and accessibility, making it easier for users to adjust settings and monitor performance. This placement also helps ensure that the thermostat can accurately read the ambient air temperature without obstructions.
Keeping the thermostat out of direct sunlight helps maintain accurate temperature readings, as sunlight can artificially warm the thermostat and lead to premature HVAC cycling. A shaded area ensures that the thermostat responds only to the room’s temperature instead of external heat sources.
What Are the Common Mistakes to Avoid When Installing a Thermostat?
When installing a thermostat, it’s crucial to avoid certain common mistakes to ensure optimal performance and energy efficiency.
- Incorrect Location: Placing the thermostat in an inappropriate location can lead to inaccurate temperature readings. Avoid areas near drafts, windows, doors, or heat sources like radiators and appliances, as these can skew the thermostat’s readings and cause inefficient heating or cooling.
- Ignoring Sunlight Exposure: Installing the thermostat in direct sunlight can cause it to misread the temperature, leading to improper system operation. Always consider the sun’s path throughout the day to prevent overheating and ensure the thermostat responds accurately to the ambient temperature.
- Neglecting Wall Material: The material of the wall where the thermostat is installed can affect its performance. Some materials may insulate the thermostat, impacting its ability to sense temperature changes accurately; thus, it’s better to install it on a wall that allows for better air circulation.
- Improper Height Installation: The height at which the thermostat is installed plays a vital role in its effectiveness. It’s recommended to install it at approximately 5 feet off the ground, which is the average height for human activity, ensuring that the thermostat measures the typical living environment’s temperature accurately.
- Not Considering Room Size: Failing to account for the size of the room can lead to ineffective heating or cooling. In larger spaces, a single thermostat may not accurately gauge the temperature; consider multiple thermostats or a zoning system for better control in larger areas.
- Overlooking Wiring Issues: Inadequate or incorrect wiring can lead to thermostat malfunctions or even circuit failures. Always ensure that the wiring is done correctly and that the thermostat is compatible with the existing system to avoid operational failures.
- Ignoring Manufacturer Instructions: Skipping over the manufacturer’s installation instructions can result in improper setup and functionality. Always refer to the guidelines provided, as they often contain crucial details specific to the model being installed.
What Locations Should Never Be Used for Thermostat Installations?
When installing a thermostat, certain locations should be avoided to ensure accurate temperature readings and optimal HVAC performance.
- Near Heat Sources: Thermostats should not be placed near heat-producing appliances like ovens, radiators, or direct sunlight. Proximity to these heat sources can lead to inaccurate temperature readings, causing the HVAC system to operate inefficiently, as it may not reflect the true temperature of the room.
- In Drafty Areas: Locations such as near windows, doors, or vents can lead to erratic temperature readings due to drafts. This can cause the thermostat to sense cooler air and trigger unnecessary heating, resulting in increased energy costs and discomfort.
- High or Low Wall Locations: Installing a thermostat too high on a wall or too close to the floor can impact its ability to gauge the average room temperature accurately. Ideally, it should be installed at eye level, roughly 5 feet off the ground, to ensure it captures the most representative temperature of the living space.
- In Direct Sunlight: Placing a thermostat in direct sunlight can lead to overheating, which will cause it to read a higher temperature than the actual room temperature. This can result in the HVAC system shutting off prematurely or operating longer than necessary, leading to discomfort and wasted energy.
- Near Humid Areas: Locations such as bathrooms or kitchens, where humidity levels can fluctuate significantly, should be avoided. High humidity can affect the thermostat’s sensors and lead to incorrect readings, which can hamper the HVAC system’s ability to maintain a consistent temperature.
How Does Proper Thermostat Placement Improve HVAC Efficiency?
Proper thermostat placement is crucial for maximizing HVAC efficiency and maintaining comfortable indoor temperatures.
- Avoid direct sunlight: Placing the thermostat in direct sunlight can lead to inaccurate temperature readings, causing the HVAC system to run longer than necessary. This can result in unnecessary energy consumption and higher utility bills.
- Keep away from drafts: Thermostats should not be positioned near drafts from windows, doors, or air vents. Drafts can cause the thermostat to sense a temperature change that isn’t representative of the overall room temperature, leading to inefficient heating or cooling cycles.
- Central location: Installing the thermostat in a central location within the home allows it to accurately gauge the temperature of the entire space. This helps ensure that the HVAC system operates effectively, providing even heating or cooling throughout the area.
- Height matters: The ideal height for a thermostat is usually around 5 feet above the floor, as this is where average adult head height is located. This placement helps the thermostat better detect the ambient air temperature without being influenced by heat rising from the ground or cooling drafts from above.
- Away from heat sources: Thermostats should be kept away from heat-producing appliances like lamps, televisions, or kitchen equipment. Proximity to these heat sources can cause the thermostat to register a higher temperature, leading to premature cycling of the HVAC system.